


Advertisement
Zero Bollinger Band (由 tenteraangin )
該使用者已經刪除了這個系統。
Zero Bollinger Band討論
Aug 04, 2017 at 09:34
121流覽
1 Replies

會員從Jan 22, 2016開始
3帖子
Aug 13, 2017 at 07:50
Hello there, let me introduce myself, my name is Iqbal, from Malaysia, starting from 2013, i learn a lot on forex. Down and up, forex teach me more than making money, it tells me about patience, perseverance, struggle.
As for this year, there some a bit hope towards a more professional trading. Below are my current strategy.
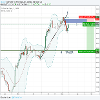
Zero Bollinger Band Technique
Parameter : Default
Timeframe : D1
Entry Rule : If price below Mid BB, SELL, if price above Mid BB BUY
SL : Swing High or Swing Low
TP: R2
I will update the analysis and screen shot starting for tomorrow, plus i already open to public for this strategy, feel free to see
As for this year, there some a bit hope towards a more professional trading. Below are my current strategy.
Zero Bollinger Band Technique
Parameter : Default
Timeframe : D1
Entry Rule : If price below Mid BB, SELL, if price above Mid BB BUY
SL : Swing High or Swing Low
TP: R2
I will update the analysis and screen shot starting for tomorrow, plus i already open to public for this strategy, feel free to see
Set and Forget about FX

*商業用途和垃圾郵件將不被容忍,並可能導致帳戶終止。
提示:發佈圖片/YouTube網址會自動嵌入到您的帖子中!
提示:鍵入@符號,自動完成參與此討論的用戶名。